
Learn how to make candles in Minecraft with string, honeycomb, dye, and flint — full crafting and lighting tips for every player today.
Introduction
Candles bring a cozy, atmospheric glow to any Minecraft build, and learning how to make candles in Minecraft is one of the simplest yet most rewarding crafting skills any player can pick up. Introduced in the Caves and Cliffs update back in 2021, candles have become a beloved decorative block for bases, horror maps, medieval builds, and birthday cakes alike.
Unlike torches or lanterns, candles offer something special: softer light, sixteen possible colors, and the ability to stack up to four on a single block for a custom brightness level. If you have ever wondered how to make candles in Minecraft from scratch, the process only requires two simple ingredients and a crafting table.
In this guide, you will learn exactly how to make candles in Minecraft step by step — from gathering string and honeycomb to dyeing your candles, lighting them safely, and even turning a basic cake into a glowing birthday cake. Every step here is verified against the official Minecraft Wiki, GameSpot, Dexerto, and ScalaCube’s official Minecraft blog.
What You Need Before Learning How to Make Candles in Minecraft
Before you can learn how to make candles in Minecraft, you need to gather two core ingredients: string and honeycomb. Both are easy to find once you know exactly where to look, though honeycomb does require a small bit of patience and preparation around bees.
According to the Minecraft Wiki, string is the easier ingredient of the two. You can obtain it by killing spiders or cave spiders, which drop zero to two strings upon death, by breaking cobwebs found in abandoned mineshafts and woodland mansions, by fishing, or by bartering with Piglins in the Nether. Any of these methods will quickly build up a healthy stock of string for ongoing candle production.
Honeycomb requires a bit more setup. According to GameSpot, honeycomb comes from beehives or bee nests, and you will need shears to collect it safely. Bee nests appear naturally hanging from trees in plains, flower forests, and birch forests, while beehives can be built by the player near a flower-filled area to attract and house wild bees. Importantly, shearing a hive without managing the bees properly can anger them, so many players place a lit campfire beneath the nest or hive first — the smoke calms the bees and prevents them from attacking while you collect the honeycomb safely.
7 Steps for How to Make Candles in Minecraft
Once you understand how to make canstringsn Minecraft using the official crafting recipe, the entire process takes only seconds per candle. Follow these seven steps for a complete walkthrough from gathering materials to lighting your finished build.
Step 1: Gather Your String
The first step in how to make candles in Minecraft is collecting string. According to Dexerto, the fastest way to gather string is by defeating spiders or breaking cobwebs, which are commonly found scattered throughout abandoned mineshafts, ruined portals, and other naturally generated spider-heavy structures across the Overworld. Each spider you defeat or cobweb you break yields a small amount of string, so plan to gather a decent supply if you intend to craft several candles for a large build.
Step 2: Build a Bee Farm or Find Wild Bee Nests
The second step in how to make candles in Minecraft is securing a steady honeycomb supply. According to a recent Minecraft guide on candle crafting, securing a consistent supply of honeycomb significantly streamlines the entire candle-making process. You can identify wild bee nests by their small, wooden, hole-covered appearance hanging from trees in plains and flower forest biomes, or you can build your own beehive near flowers to attract bees naturally over time.
Step 3: Shear the Honeycomb Safely
According to the official Minecraft Wiki, you should place a lit campfire directly under the bee nest or hive before shearing it. The smoke calms the bees so they will not attack while you collect honeycomb with your shears. Just be careful not to let the campfire ignite nearby trees if you are working in a forest biome — placing a non-flammable block beneath the campfire is a smart precaution that many experienced players take before harvesting.
Step 4: Open Your Crafting Table
With both string and honeycomb in your inventory, the next step in how to make candles in Minecraft is opening a crafting table to access the 3×3 crafting grid. According to the official Minecraft Wiki, the candle recipe is actually shapeless in terms of exact grid position, but the relative placement of string directly above honeycomb is the pattern most commonly shown in official guides and crafting tutorials.
Step 5: Arrange String and Honeycomb Correctly
According to GameSpot, you should place the honeycomb in the center crafting square with the string placed directly above it in the row above. Using this configuration, the crafting interface shows one plain, undyed candle in the result box. According to the Minecraft Wiki, because the recipe is shapeless, you can technically also craft a candle using the simpler 2×2 crafting grid found in your player inventory, as long as the string sits in the slot directly above the honeycomb.
Step 6: Move the Candle to Your Inventory and Repeat
Once the candle appears in the result slot, simply drag it into your inventory to complete the crafting process. Remember that this recipe yields only one candle per crafting action, so if you are planning a large decorative build, you will need to repeat this process — and gather additional string and honeycomb — many times over. According to a Minecraft crafting guide, this is one of the few recipes that genuinely rewards setting up a dedicated bee farm in advance.
Step 7: Dye Your Candle for a Custom Color
The final step in how to make candles in Minecraft, if you want anything other than the default yellowish-white color, is dyeing. According to ScalaCube, you can change a candle’s color by combining it with any one of the sixteen available dye colors at a crafting table, in a process similar to coloring a firework rocket. According to the Minecraft Wiki, this recipe is also shapeless, meaning the candle and dye can be placed anywhere together in the crafting grid, and there are sixteen dye colors available, giving you seventeen total candle variants once you include the plain undyed version.
How to Get Different Dye Colors for Candles
According to ScalaCube, dyes are most commonly obtained from flowers, which can be collected and kept in your inventory to produce a dye matching that flower’s specific hue. Green and lime green dyes are a notable exception, as these are obtained by smelting cactus or sea pickles in a furnace rather than from flowers directly.
It is important to note one limitation when learning how to make candles in Minecraft with color: you cannot mix dyes to create entirely new color variants, and once a candle has been dyed, you cannot change its color again without breaking the placed candle, returning it to the crafting grid with a new dye, and placing the freshly dyed version back down in the world.
How to Light a Candle in Minecraft
Once you understand how to make candles in Minecraft, lighting them is the next essential skill. According to the Minecraft Wiki, a freshly placed candle is always unlit by default, so you must right-click it with flint and steel to ignite the flame. Flint and steel itself is crafted by combining one iron ingot with one piece of flint at a crafting table.
According to GameSpot, you can also light candles using a fire charge fired from a dispenser, or by allowing lava or another already-burning block to ignite the candle as a side effect, though flint and steel remains the most direct and controllable lighting method for most players. Once lit, a candle burns indefinitely and never melts down or shrinks — the only ways to remove a lit candle are breaking its block, flooding the area with lava, or destroying it in an explosion.
How to Extinguish a Candle
To put out a lit candle, simply right-click it with an empty hand, according to the Minecraft Wiki. This extinguishes the flame while leaving the candle block itself in place, ready to be relit later. You can also extinguish a candle using a splash water bottle or by exposing it directly to water, though these methods are generally less precise for everyday use than the simple empty-hand interaction.
Stacking Multiple Candles for Brighter Light
One of the most useful things to understand once you know how to make candles in Minecraft is the stacking mechanic. According to the Minecraft Wiki, up to four candles can occupy the same block space, similar to how sea pickles stack. To add additional candles, simply hold a candle in your hand and right-click on a candle that is already placed — each new candle snaps neatly into the same block space alongside the previous ones.
| Light Level | Number of Lit Candles |
| 3 | 1 candle |
| 6 | 2 candles |
| 9 | 3 candles |
| 12 | 4 candles (maximum) |
Related to knowing how to make candles in Minecraft, according to the Minecraft Wiki, a single lit candle only emits a light level of three, which is too low to prevent most hostile mobs from spawning nearby, since the majority of monsters spawn at light levels between zero and seven in the Overworld. A full cluster of four lit candles raises the light level to twelve, which is closer to — but still slightly below — the light level fourteen produced by a standard torch or the light level fifteen produced by a lantern.
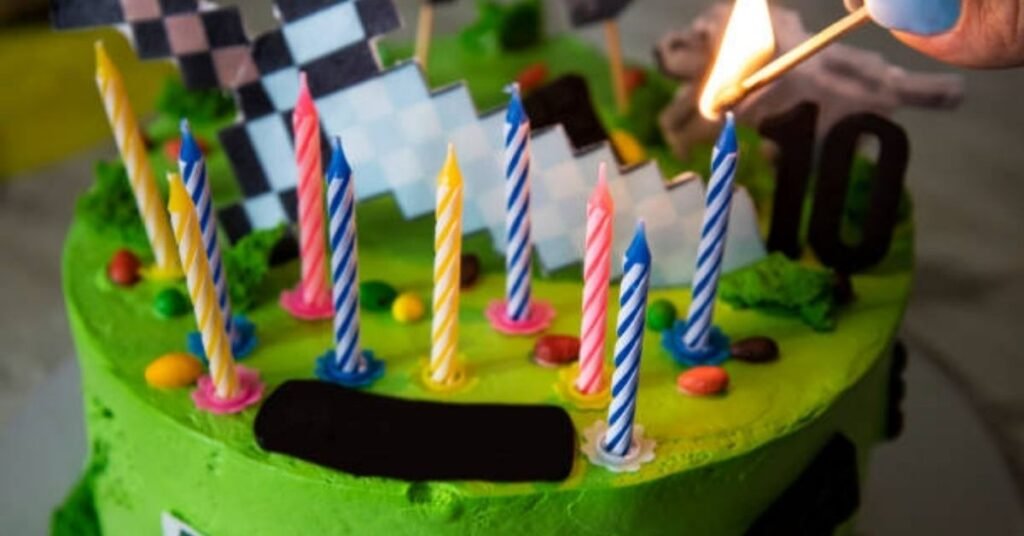
Making a Birthday Cake with Candles in Minecraft
A particularly fun application, once you know how to make candles in Minecraft, is creating a birthday cake. According to ScalaCube, you simply place a cake block on the ground and then place a candle directly on top of it, just as you would place one on a regular block, to create a glowing birthday cake decoration.
According to the Minecraft Wiki, a cake can only ever hold exactly one candle of any color, and the usual four-per-block stacking rule does not apply to cakes specifically. If the cake is eaten by a player or breaks for any reason, the candle on top will go out automatically, so this combination works best as a purely decorative centerpiece rather than something placed in a high-traffic area of your base.
Why Candles Are Useful Beyond Just Decoration
Beyond aesthetics, candles offer some genuinely practical advantages once you have learned how to make candles in Minecraft. According to the Minecraft Wiki, candle flame does not spread to nearby blocks, which means you can safely build an entire structure out of wood and place lit candles throughout it without any risk of accidentally setting your build on fire — a real advantage over open flame sources in flammable areas.
Candles also do not melt near snow, according to GameSpot, making them an excellent lighting option for igloos, snowy biome bases, and any cold-weather build where a torch’s heat might otherwise be undesirable or thematically inappropriate. Additionally, lit candles can be extinguished by piston movement, since the flame state of a candle is tied to the block remaining stationary, so keep this in mind if you are incorporating candles into any redstone-powered contraption or moving structure.
Conclusion
Now that you know how to make candles in Minecraft from start to finish, you have a versatile new decorative tool for every kind of build, from cozy cottages and medieval castles to spooky horror maps and birthday celebrations. The two-ingredient recipe of string and honeycomb makes candles one of the most accessible light sources in the entire game, and the sixteen available dye colors give you near-limitless creative freedom.
Whether you are illuminating a dark cave entrance, decorating a dining room table, or building an entire candlelit chapel, mastering how to make candles in Minecraft opens up a whole new layer of atmospheric, personalized design for your world. Gather your string and honeycomb, fire up that crafting table, and start lighting up your builds today.
Frequently Asked Questions (FAQs)
Q1: What ingredients do I need to learn how to make candles in Minecraft?
To learn how to make candles in Minecraft, you need exactly two ingredients: one string and one honeycomb. String comes from spiders, cobwebs, fishing, or Piglin bartering, while honeycomb comes from beehives or bee nests collected safely using shears, ideally with a calming campfire placed beneath the hive first.
Q2: How do I dye a candle after I learn how to make candles in Minecraft?
Once you know how to make candles in Minecraft, dyeing one is simple: place the plain candle and any one of the sixteen available dye colors together at a crafting table. The recipe is shapeless, so exact placement does not matter, but remember you cannot change a candle’s color again once it has already been dyed and placed in the world.
Q3: How many candles can I place on one block in Minecraft?
You can place up to four candles on a single block, similar to how sea pickles stack. Each additional lit candle raises the light level of that block by three, reaching a maximum light level of twelve with four candles lit together, which is still slightly dimmer than a single standard torch or lantern.
Q4: Can lit candles set my Minecraft build on fire?
No. According to the Minecraft Wiki, candle flame does not spread to nearby blocks, meaning you can safely place lit candles throughout an entire structure made of wood or other flammable materials without any risk of accidentally igniting your build, unlike other open flame sources in the game.
Q5: How do I make a birthday cake using candles in Minecraft?
To make a birthday cake, place a regular cake block on the ground and then place a candle directly on top of it, exactly as you would place a candle on any other block. A cake can only ever hold one candle regardless of color, and if the cake is eaten or destroyed, the candle on top will automatically go out.
With over 5 years of hands-on experience in the creative arts, I have turned my passion for DIY and home styling into a mission to inspire others. As the lead creator at UnboxTreats, I specialize in the fine details of paper crafting, yarn work, and artisanal candle making. I test every craft and decor trend to ensure you get only the most reliable and creative advice for your home.
")

")


")
